We have now completed the custom Willow Appliance pull as can be seen from the photos here.
The custom pull was created by joining the right and left Willow cabinet handles to create the desired length of 17”. The length of the pull and shape of the sprig were perfectly suited to create this new item without our needing to substantially redesign the sprig and without the need to create a new pattern or mold. As discussed in an earlier post (Jan 16,2020) the new pull was created by melding and tooling 2 wax sprigs to create a single piece that was then shelled with several coats of a silica slurry before being fired to create a rigid shell.We cast these pieces in silicon bronze and then finished them in 3 different ways. The first photo below shows the effect achieved by finely buffing the bronze with successive grits of sanding compound. The deep undercuts created by the willow leaves create a shadow that adds subtle depth to the finished piece.
For a more dramatic pewter look we finished one piece using a full strength black oxide and gently removed a little of the solution around the edges of the leaves to create a very soft bronze glow, you will need to zoom into the second photo to understand what I mean.
For maximum contrast we finished the third piece with bold contrasting bands of black oxide that we removed in adjacent areas to create a striated piece.


Creating A Custom Appliance Pull Using the Lost Wax Process - the Wax Stage
We are currently working with a local designer who has specified many of our Willow cabinet pulls but who also needed a taller version of our Willow Sprig for use as an appliance pull. The client’s kitchen, not surprisingly, only required 3 large pulls and did not warrant the cost of a new patterns and mold. As our work is made using the lost wax method, we were able to create 3 new pieces by hand and by combining wax models. Please refer to our earlier post to see how the new pull was designed using a left and right facing Willow Sprig.
Step 1
A total of 3 Willow sprigs were created in wax. A left and right wax sprig were made for each end of the new piece and a section of a second left sprig was used to make a connector between the 2 ends. Picture below shows melted red art wax made by Westech being poured into the sprig mold, the wax has a relatively low meting point of 160 degrees.

Step 2
The mold is held together until the wax has cooled and solidified at which point the mold is pulled apart and the wax pattern thereby released.

Step 3 and 4
The section to be used as a connector was cut from the wax sprig using a heated blade and then further heated with an air torch so that it could be bent to the correct shape.
The ends of the left and right sprig were cleaned and refined with a hand chisel.
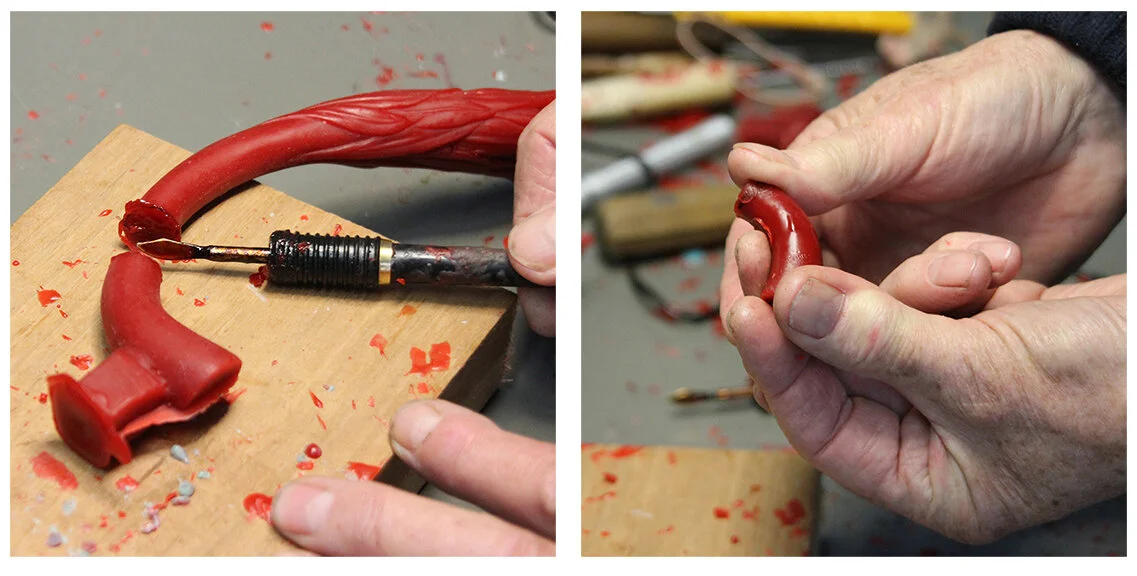
Step 5
The ends of the left and right sprig were cleaned and refined with a hand chisel and then joined to the connector using a heated blade which melts the wax enabling it to be melded together to form one continuous piece.

Gold Cabinet Pulls or Polished Bronze?
When is gold truly gold and when is it polished bronze? This is a tongue in cheek question and the answer reflects (pun intended) the high luster and jewel like appearance of polished bronze.
While we do occasionally gold plate our door hardware and while this clearly adds value to the item, for many, the appearance of gold is what is needed to create an accent to cabinetry.
Bronze is an alloy containing copper and this is what makes it a golden color. Copper and Gold are both elements on the Periodic table Cu and Au respectively and while they are both malleable and were used by early man they differ considerably in terms of scarcity and hence cost. A visit to https://www.jlab.org/ revealed that the “name Copper comes from the Latin Cuprum meaning “from the Island of Cyprus” which is where the Romans obtained the majority of their copper ore. The name gold comes from the Sanskrit word Jval and the Anglo-Saxon word gold.” Gold and bronze are both very soft mediums and in the case of silicon bronze tin and silicon are adding to copper to create a harder more durable alloy.

To create a highly polished surface the casting goes through 3 stages of progressively finer buffing;
First, we buff it using a high strength non-woven nylon disk on a mechanized buffing wheel, as the disk is not woven it is pliable and can buff irregular shapes. The material of the disk contains aluminum oxide a mineral that makes sharp very fine cuts into the surface of the bronze which helps to create consistent brush marks over the entire surface. We use a medium grit disk made by Standard Abrasives.
The piece is then hand polished using a 400-grit fine wet/dry sandpaper.
Lastly, we buff the pull on a cloth buffing wheel. Buffing compound is applied to the edge of the rotating cloth disk and when sufficiently coated the pull is pressed against the edge of the disk to create a high luster.
The Design Process for Door Handles
Creating door hardware is a balancing act where artistic inspiration is balanced and refined to meet the practical demands of functionality.
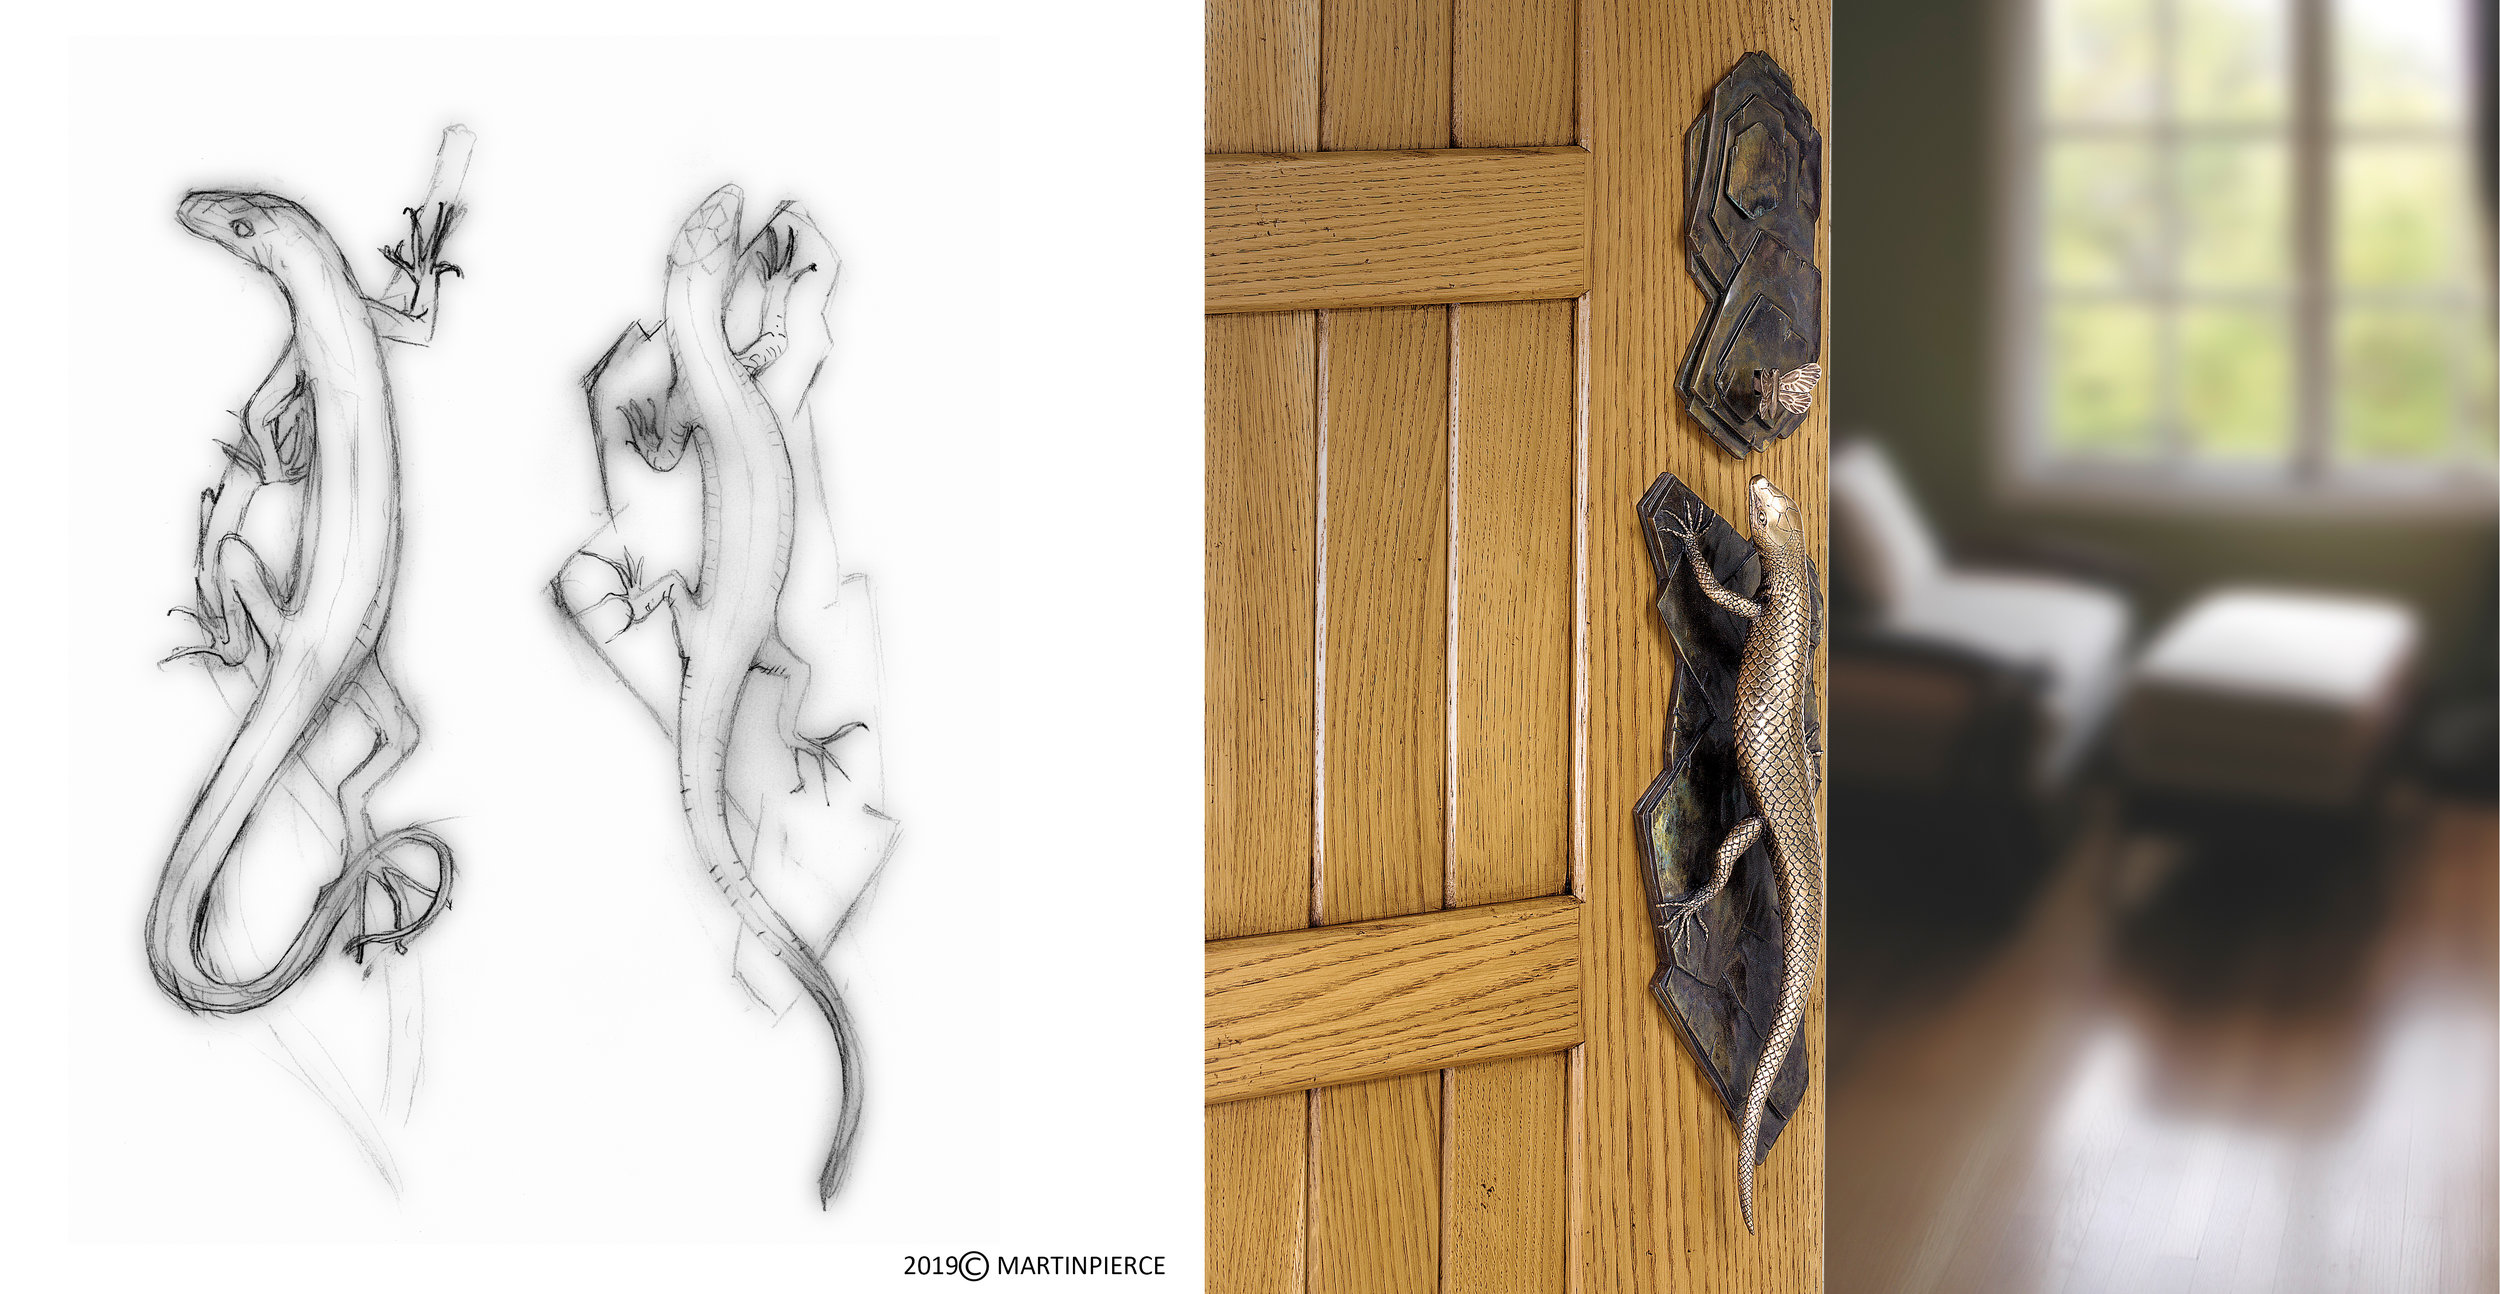
Continuing from last weeks post I want to share some of the initial designs that were submitted to designer Debbie Zylstra for her client’s home in Kailua-Kona. Debbie was in the process of designing a home entertainment center in Koa wood and wanted to incorporate dramatic door pulls for sliding doors. The cabinet was grand in scale at a height of 9’ and the lizard heroic handles were considered as a possibility. These pieces are extremely realistic, and the client wanted something more stylized and original but in the reptile family so, pencil in hand, Martin sketched out the iguanas. Martin designed 2 interlocking iguanas which give the illusion of being 2 different pieces, but which use one iguana that is inverted to create a pair. To get a sense of proportion he then reduced the scale and inserted the design into a scaled drawing of the cabinet. The body and head of both iguanas project out from the cabinet door by 4” and the underside of each projects 1 ½” so that there is enough clearance for the hand to grab either the head or tail of each iguana to slide the pocket door open. The angle of the head, legs and tail were made so that the pair would interlock comfortably but leave sufficient space so that fingers would not be pinched.


Below are the original sketches for the first large reptile sculptures that are the central pieces in the Lizard collection. Given their realistic design Martin felt he needed to create a left and right facing lizard so that he could more naturally capture the movement of a pair of lizards. The pair was designed so that the head of the right lizard protrudes beyond the slate back-plate allowing the thumb to then be extended to depress the butterfly thumb piece and thereby release the door latch.
When is a wine cellar a grotto?
If this sounds like a punch line to a joke, then please do let me in on the joke.
The answer maybe “When you live in Texas”.
I had a lovely conversation this week with a resident of Texas and since we both have accents and are soft spoken I spent a good 3 minutes believing I had misunderstood when she had asked if we made hardware for wine grottoes, eventually I confessed my ignorance and my vocabulary has now grown.
Turning to Wikipedia I discovered that the word comes from the Italian “grotto” and the French word “grotte” both meaning either a natural or man-made cave or cellar not surprising given that both countries have been making wonderful wines for centuries.
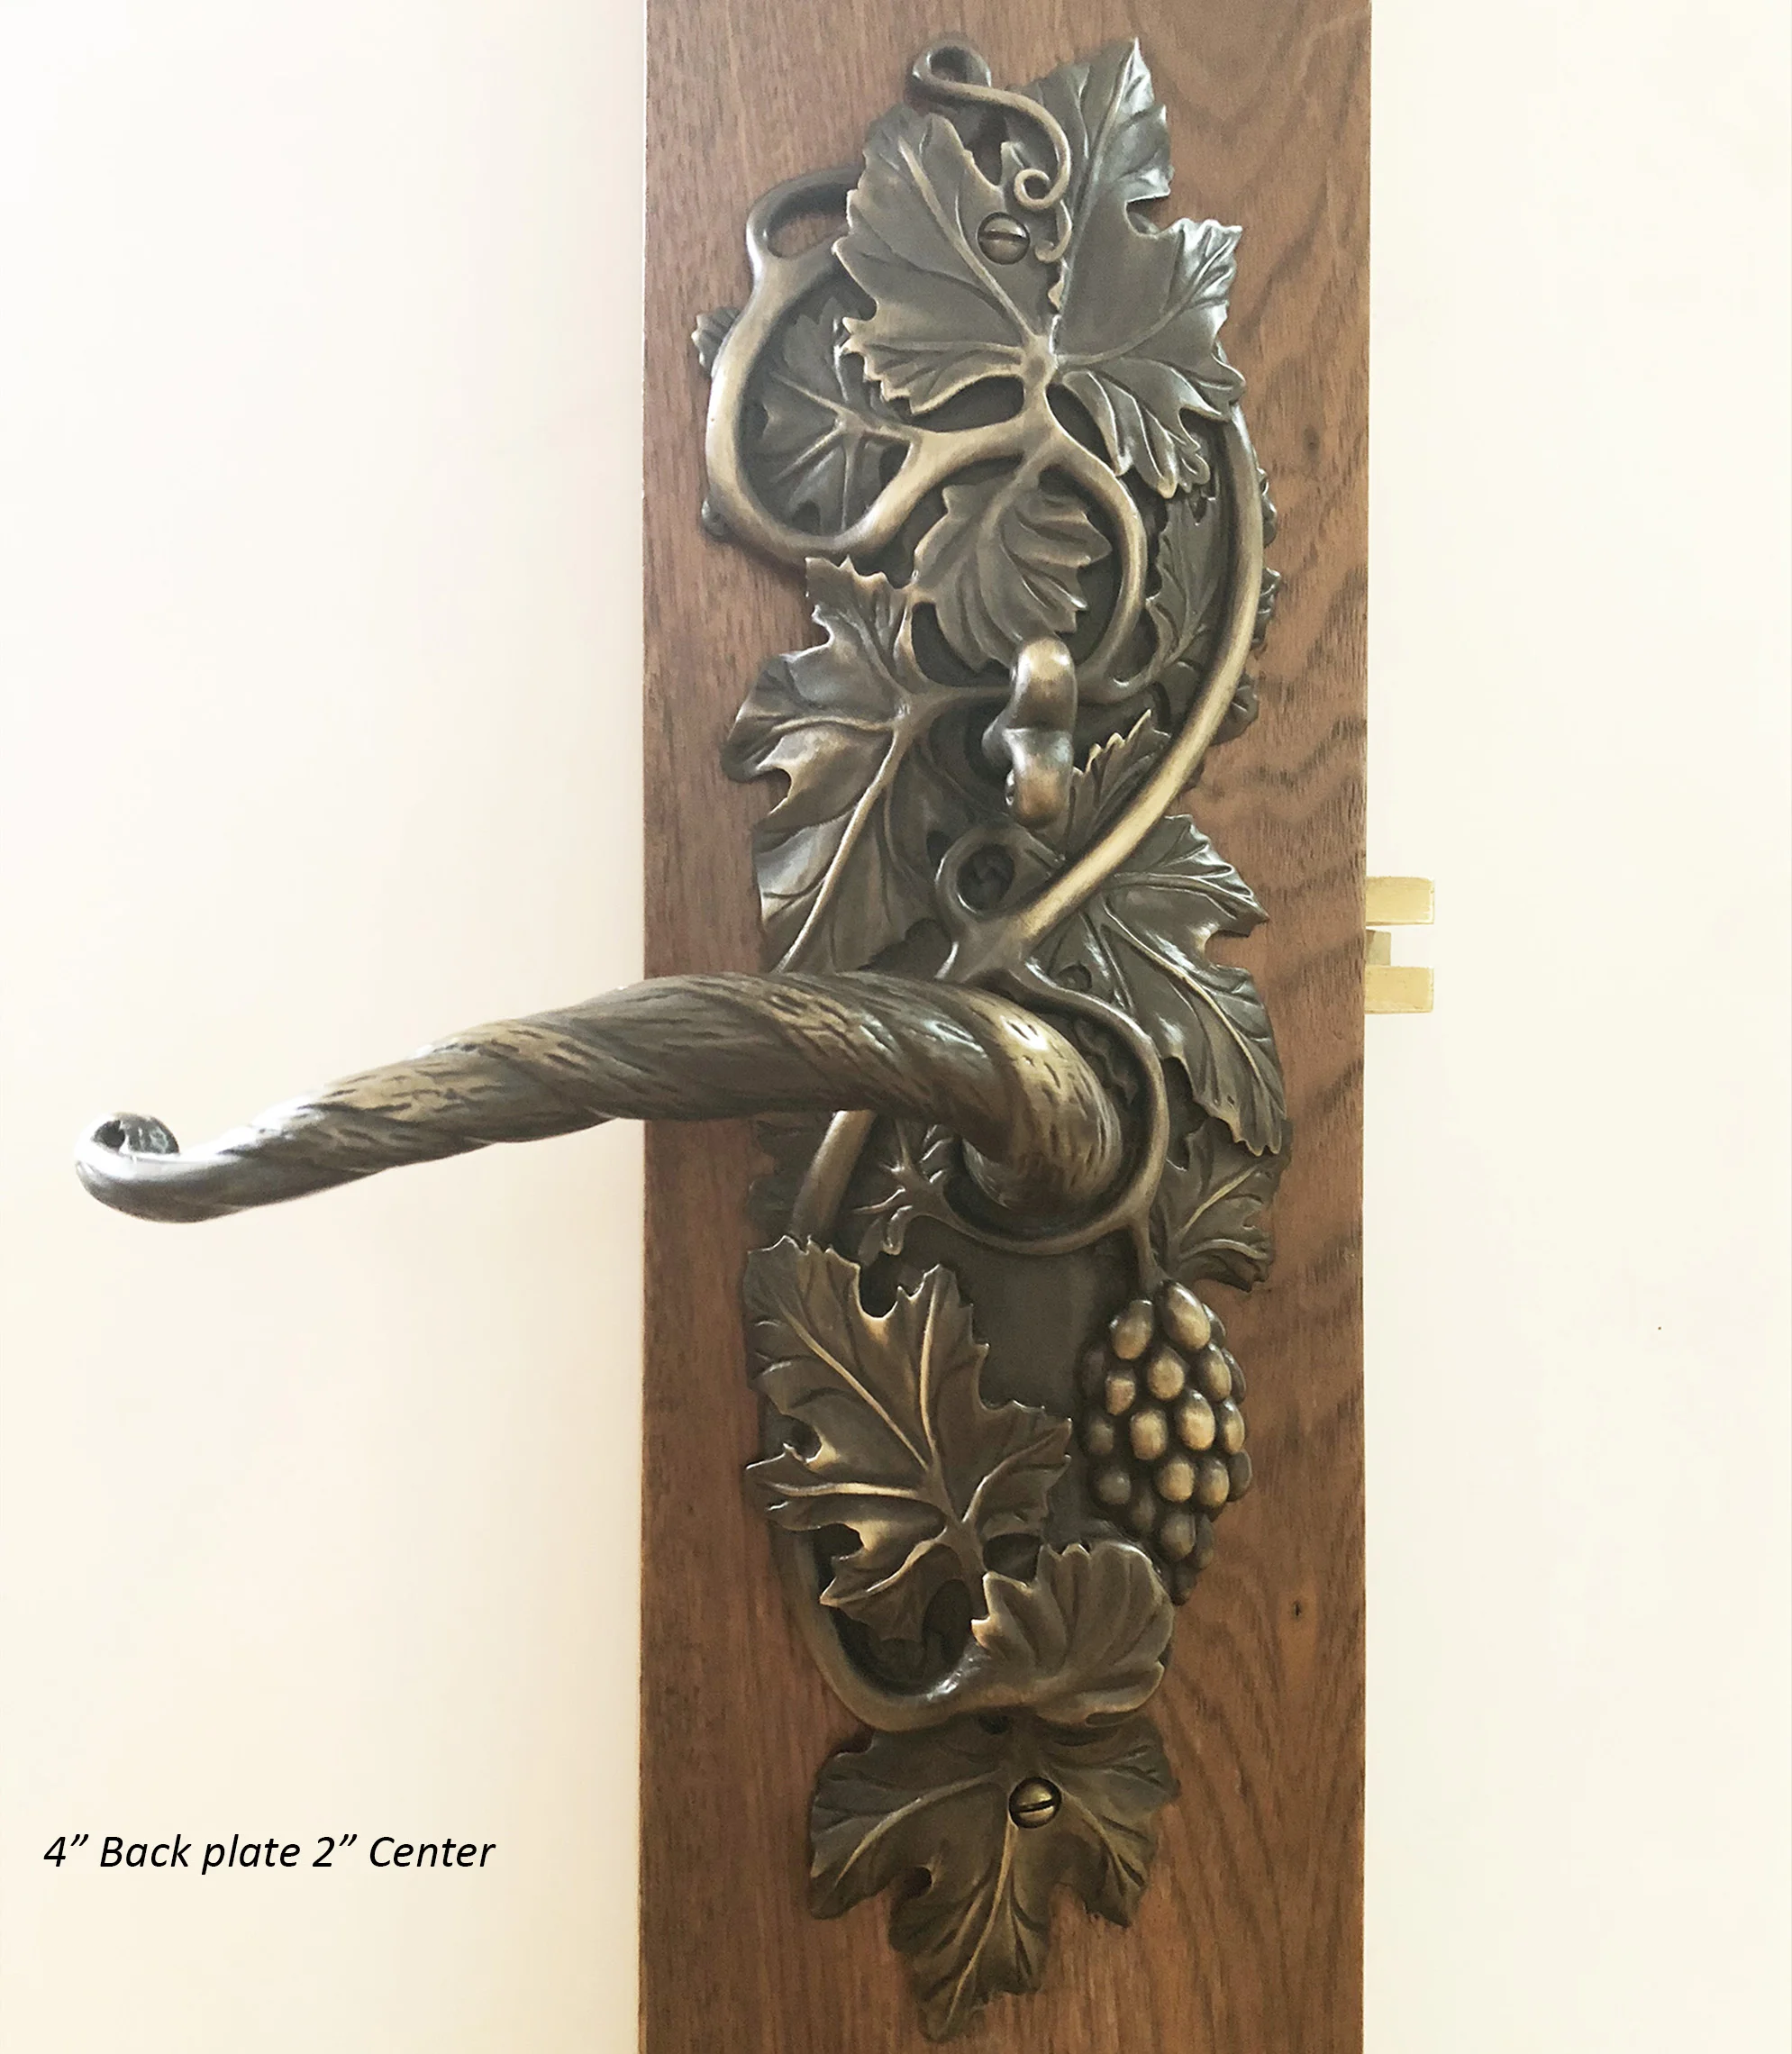
Next I turned by attention to the back set of the door that was being custom made in maple with a proposed back set of 2 3/8”. The back set is the distance from the edge of the door to the center point of the back plate or escutcheon. The wider the back plate the deeper the back set will need to be. The center of the back plate is where the lever or knob will be positioned or in the case of a locking door it will also be where the cylinder face is positioned. The handle set components are centrally positioned on the back plate to give symmetry to the trim. The handle set is then positioned on the door stile and if sufficiently wide will be centered but if space is tight it may be positioned closer to the edge of the door.

Door latches and locks are made with standard back sets with 2 3/8” and 2 ¾” being common for tubular latches and 2 ½” and 2 ¾” being common for mortise locks.
The Grapevine entry lever set has a standard back plate that is 4” with the center being 2”. If the door was built with a bore hole for lever/knob at a back set of 2 3/8” then this would leave a mere 3/8” clearance from the outer edge of the back-plate to the edge of the door an area that will often be caught by the door’s stop which is why we recommend a 2 3/4” back set. For doors that have already been drilled for a 2 3/8” back set we do offer a narrower 3 3/8” back plate with a 1 11/16” center.
Painted Lady Butterflies and Their Influence on Door Hardware Designs
Painted Lady Butterflies and their influence on Hardware Designs
Like so many in Los Angeles we have been stunned and are “gob-smacked” at the multitude of Painted Lady Butterflies that we have seen this week. These small pretty insects are everywhere but only once has my iphone been to hand to snap a couple of shots.
While the monarch butterfly is sadly in rapid decline, for this year at least, the Painted Lady population is booming with billions passing through on their way north from the Mojave Desert. The exceptional rains that have put a temporary hold on California’s drought have given rise to an abundance of nectar as food for these migrating beauties. The short life cycle of a butterfly consists of 4 stages from egg, to caterpillar to pupae and then to butterfly and for the Painted Ladies lasts about 4 to 5 weeks.
I was surprised to discover that these small beauties can travel at speeds of 25 miles an hour and cover as much as 100 miles per day but this explains how they are able to make their trek from the Mojave to Northern California in their short lives.
We have been inspired by butterflies as well as bees, wasps and moths in our collection of insect cabinet pulls. We also have incorporated a butterfly as the thumb-latch for our entry way lizard handle set.

The Painted Lady captured here drinking from Clematis demonstrates this butterflies preference for purple clustered flowers, a fact observed by Katelyn Boisvert in her paper presented at the Young Naturalist Awards.
